

How to Automatically Extract Content Ideas from Your Newsletter Subscriptions Using AI (Part 1/5)
Setting up Google Cloud project to access Gmail

Your inbox is a goldmine going to waste.
You subscribe to dozens of newsletters in your niche for inspiration, but most sit unread in your inbox or get skimmed once and forgotten.
What if you had a system that automatically:
Monitored your Gmail inbox for newsletters from your favourite senders
Used AI to find insights from those newsletters
Generated content ideas inspired by the incoming newsletter but tailored specifically to your audience
Provided each article a ‘Potential’ score indicating which ones will likely resonate most strongly
Stored everything in Google Sheets so you can instantly find most relevant content ideas for your audience
In this series, we’ll build this system.
Here’s a preview of what this system will do
Read an unread email from your inbox

Push that through the automation
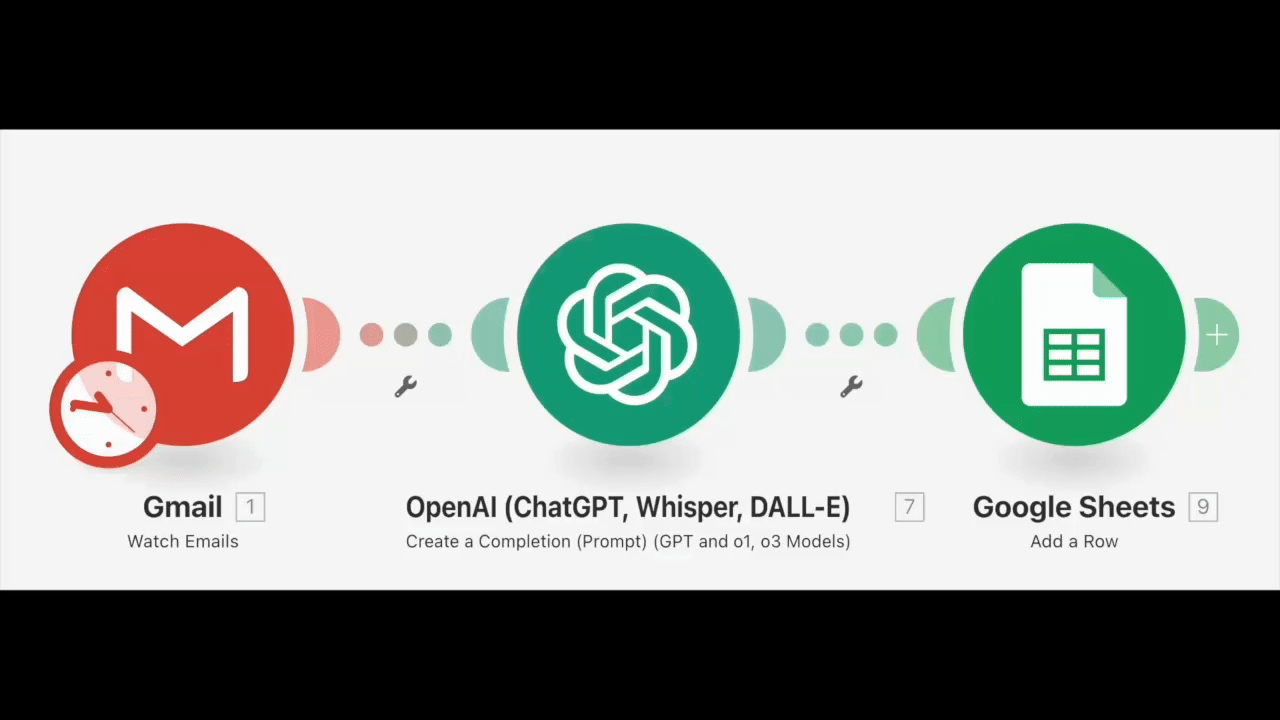
Output 3 article ideas based on this email but tailored to YOUR audience


Mark the email as read so we don’t process it again

Let’s go!!!
Series Breakdown
Since the whole automation requires quite a few steps, I’ve broken this series into 5 parts:
Setting up our Google Cloud Project so that we can automatically monitor our inbox
Connecting Gmail to Make, our automation engine
Getting an API key from OpenAI
Connecting Gmail to ChatGPT and extracting article ideas
Storing the article ideas in Google Sheets
While this setup requires some initial effort, it creates a permanent asset for your writing business — an ever-growing database of content ideas curated specifically for your audience.
Note: Nobody will be able to access your inbox automatically apart from you.
This article is more comprehensive than usual and includes many screenshots to guide you through each step. For the best experience, view it on a larger screen.
If you’re reading this in email, it may be clipped due to length. Click here to view the full tutorial on the website.
Let’s begin.
What is Make?
Make.com is an automation platform that lets you connect different apps together (like Gmail and AI tools) using a simple visual interface. No coding required.
For this tutorial, we’ll be using Make’s free plan.
Step-by-Step Gmail Connection Process
Here’s what we’ll accomplish in this article:
Create a Google Cloud project
Enable the Gmail API
Set up authentication
Add authorized domains
Configure test users
Set up API permissions
Create client credentials
Configuring your Gmail account for Make involves a few technical steps.
But don’t worry.
I’ve broken everything down into manageable pieces. This is a one-time setup that will enable all your future Gmail automations.
Note: Make.com was previously called “Integromat” and some references to the earlier name still appear in the setup process. Don’t get confused — they’re the same platform.
1. Creating Your Google Cloud Project
First, we need to create a project in Google Cloud that will allow Make to access your Gmail account:
Go to https://console.developers.google.com/
Even though we’re using the Google Developers site, you won’t need to write any code. Also, this is needs to be done only once for each Gmail account.
If this is your first time accessing the developers console with this email, you’ll need to agree to Google’s terms and conditions.

Once you’ve agreed to the terms, you’ll land on the APIs and Services dashboard.
Click on Create project

Give your project a name like “Newsletter Automation” or “Gmail-Make Integration” and click Create.

Wait for Google to finish creating your project. You’ll be taken to the project dashboard once it’s complete.
✅ Progress Check: You’ve created a Google Cloud project that will house your Gmail integration. This is the foundation for your automation system.
2. Enabling the Gmail API
Now we need to give the project permission to work with Gmail:
From your project dashboard, click on Enable APIs and Services. It will take you to the API Library dashboard.

In the API Library search bar, search for “Gmail” and click on “Gmail API”

You’ll see two results: “Gmail API” and “Gmail Postmaster Tools API”
Select “Gmail API”

On the Gmail API page, click the Enable button

✅ Progress Check: You’ve enabled the Gmail API, which gives your project the ability to interact with your Gmail account.
3. Setting Up Authentication
After enabling the API, we need to create a consent screen (this is what you’ll see when connecting Make.com later):
From the sidebar, click on OAuth consent screen

In the next screen, select Overview from the sidebar, and click on Get Started. This will take you to the Project Configuration screen

In the Project Configuration screen, you’ll see the App Information section
In the textbox that says App name, enter “Make Gmail Integration”
In the textbox that says User support email, select your Gmail address from the dropdown
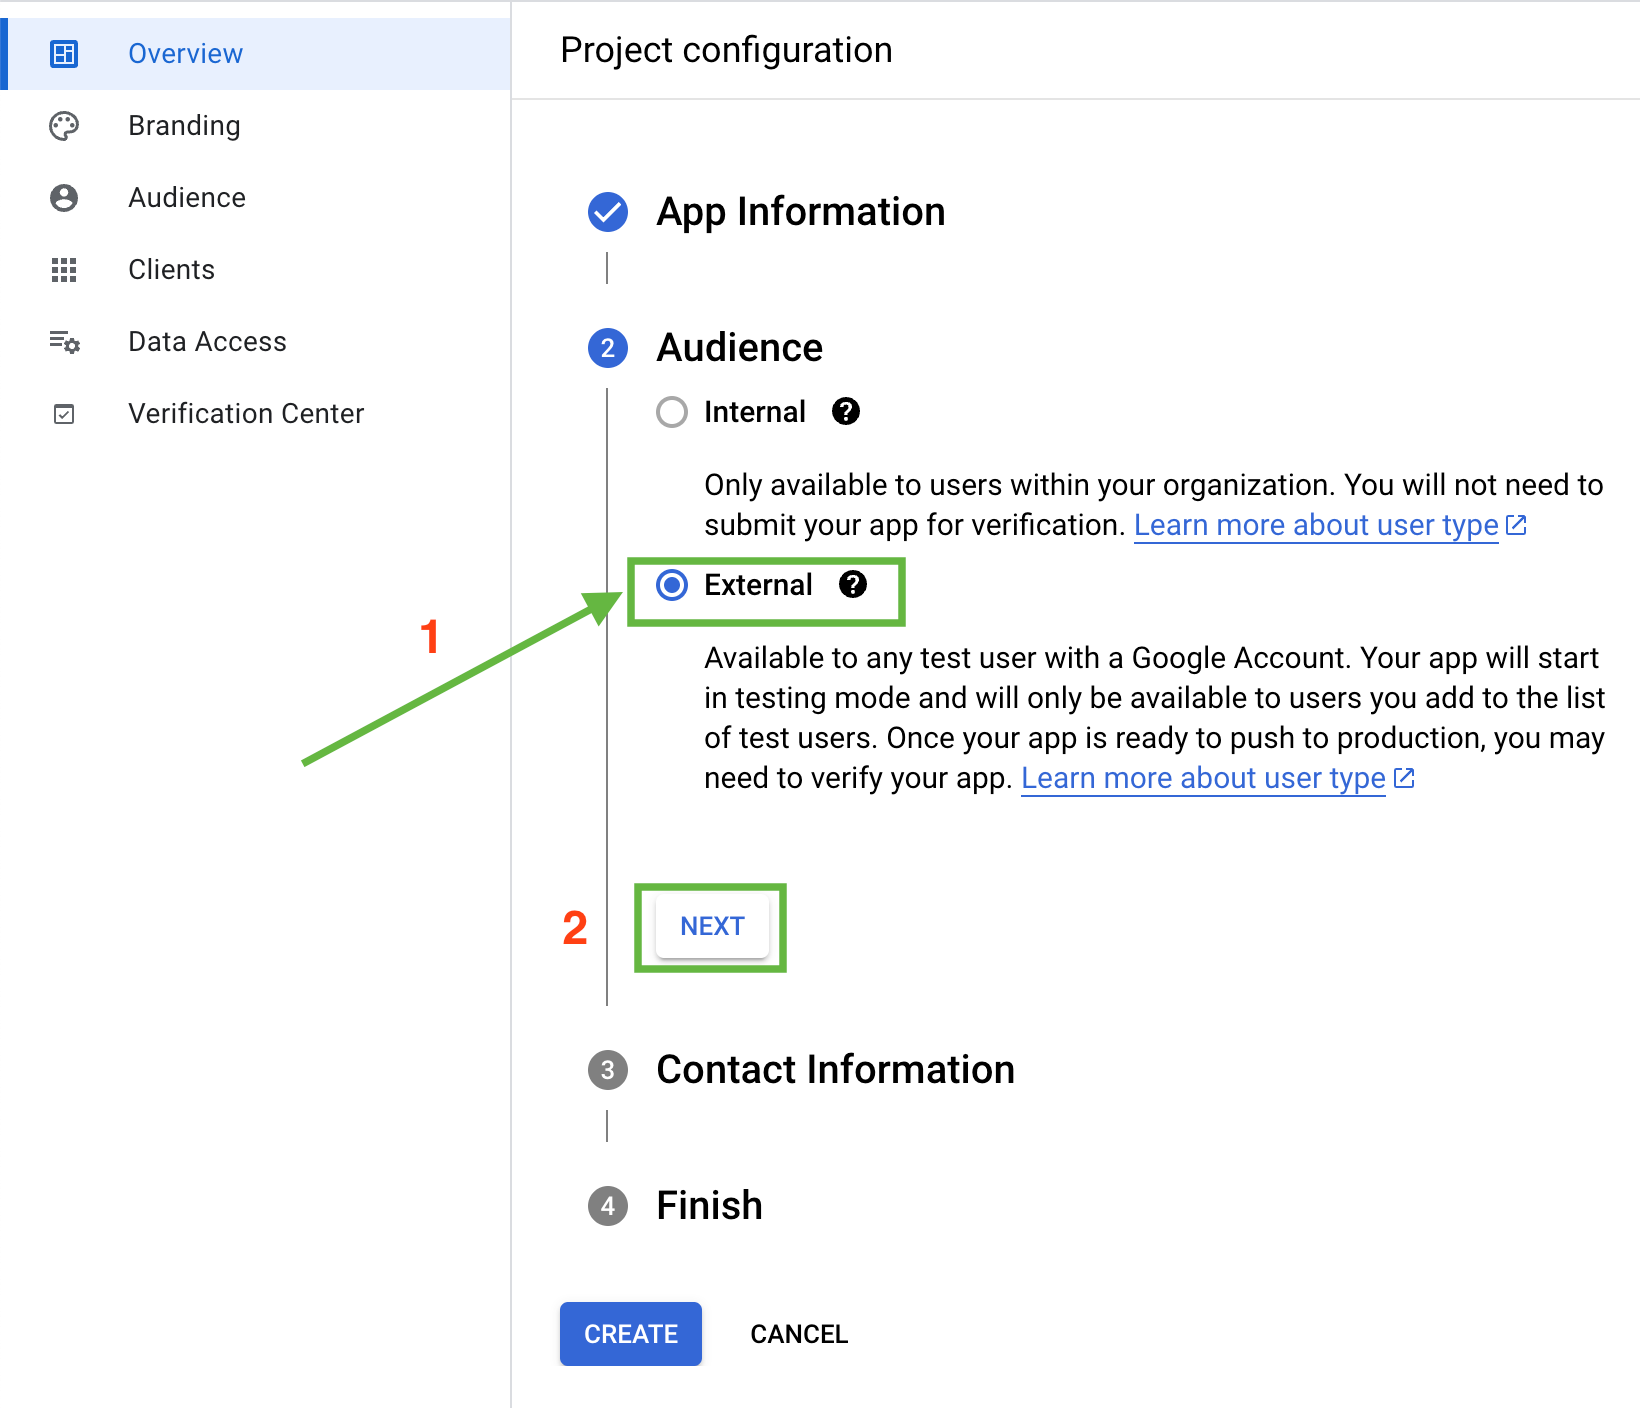
Click Next. This will take you to the Audience section

Note: Nobody will be able to use this application except for people you personally authorize as test users later in this process. So don’t worry.
In the Audience section, you need to specify the user type that will be able to access the project
“Internal” - This will allow other users inside your organization to access this project. But, since we’re building an integration for a personal gmail account, this doesn’t apply.
“External” - This will allow any test user with a Google Account to access this Project. Later in the process, we will add our own Gmail ID as the test user, and the application will only be available to us.
Since we’re setting up for a personal Gmail account, select “External”
Click Next
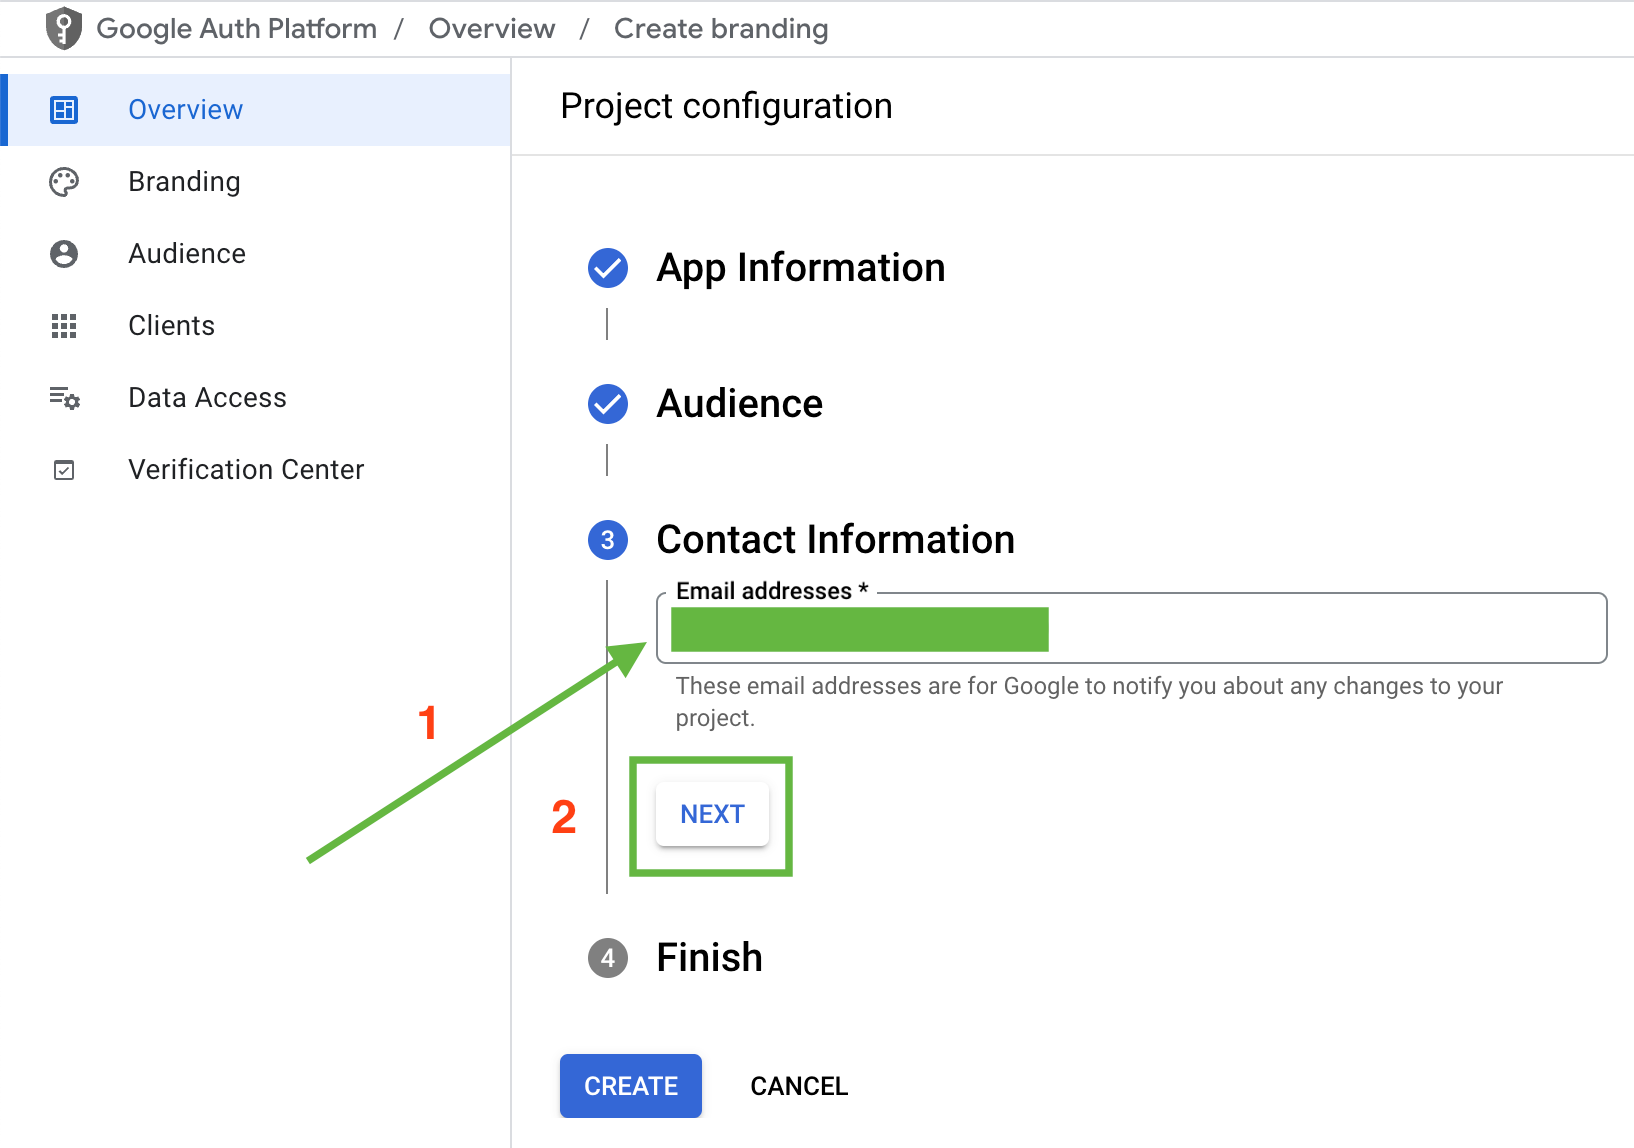
In, the Contact Information section, you’ll need to provide an email ID where Google will send relevant updates about your project. Enter your Gmail address
Click Next
In the Finish section, check the checkbox to agree to Google API Services policy
Click Continue and then Create

✅ Progress Check: You’ve set up authentication for your project, which controls who can access your Gmail data through this integration.
You’re halfway through the setup process!
4. Adding Authorized Domains
Next, we need to add the domains that will be allowed to use this connection:
Select Branding from the sidebar
Scroll down to Authorized domains
Click Add domain

You’ll need to add two domains here:
make.comintegromat.com
Ensure that you add both domains. Make used to be known as Integromat before, and it still uses the old name in the backend
After adding both domains, click Save

5. Adding Test Users
Now we need to create test users who will be able to access your project:
Select Audience from the sidebar
Under Test users, click Add Users

In this screen, enter your Gmail account that you want to use in Make
Click Save

✅ Progress Check: You’ve authorized Make.com domains and added yourself as a test user. This ensures that only you can use this connection to access your Gmail.
6. Setting Up API Permissions
In this step, we’ll define the functions we can perform in Gmail through Make:
Select Data Access from the sidebar
Click Add or remove scopes

In the screen that opens, type “Gmail” in the search box and select “Gmail API” from the dropdown

Set the rows per page to 20
Select the following scopes by checking their boxes:
mail.google.comgmail.modifygmail.composegmail.readonlygmail.metadatagmail.insertgmail.sendgmail.labels

Click Update at the bottom of the screen

In the next screen, scroll down to the bottom and click Save
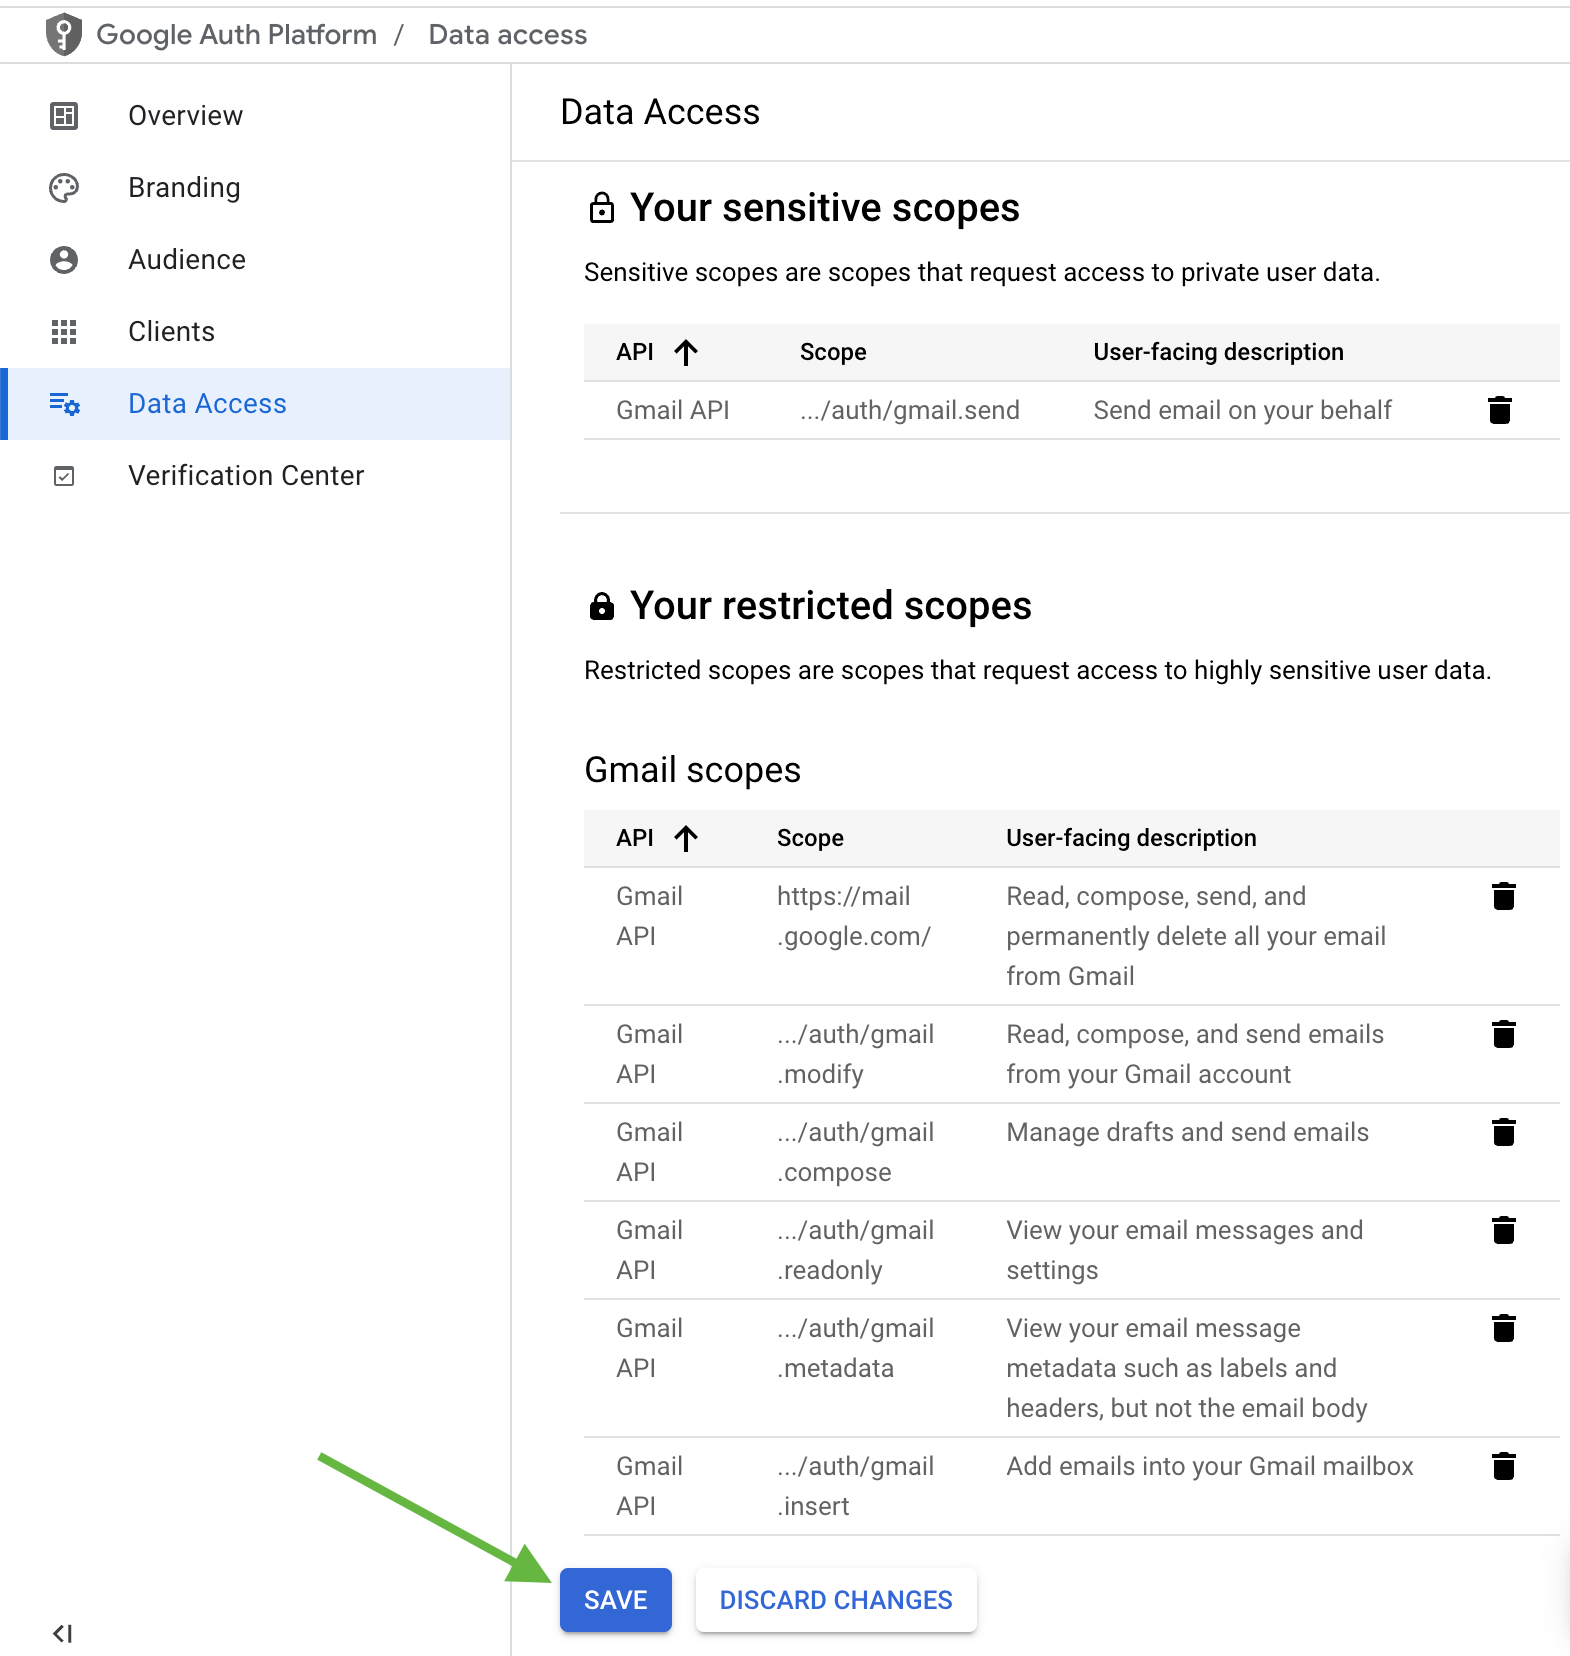
✅ Progress Check: You’ve defined what actions your automation can take on your Gmail account.
7. Creating Client Credentials
We’re in the final step of configuring the project.
Now we need to create credentials that Make will use to connect to your Gmail account:
Select Clients from the sidebar
Click Create Client

In the Application type dropdown, select Web application

Under name, provide a name that will help you identify this connection (like “make-gmail-integration”)

Scroll down to the Authorized redirect URIs section
Click Add URI and enter the following URI exactly:
https://www.integromat.com/oauth/cb/google-restrictedAfter entering the URI, click Create

Once you click Create, the dashboard will display the OAuth 2.0 Client IDs created
Click on the download button to view the Client ID and Client secret

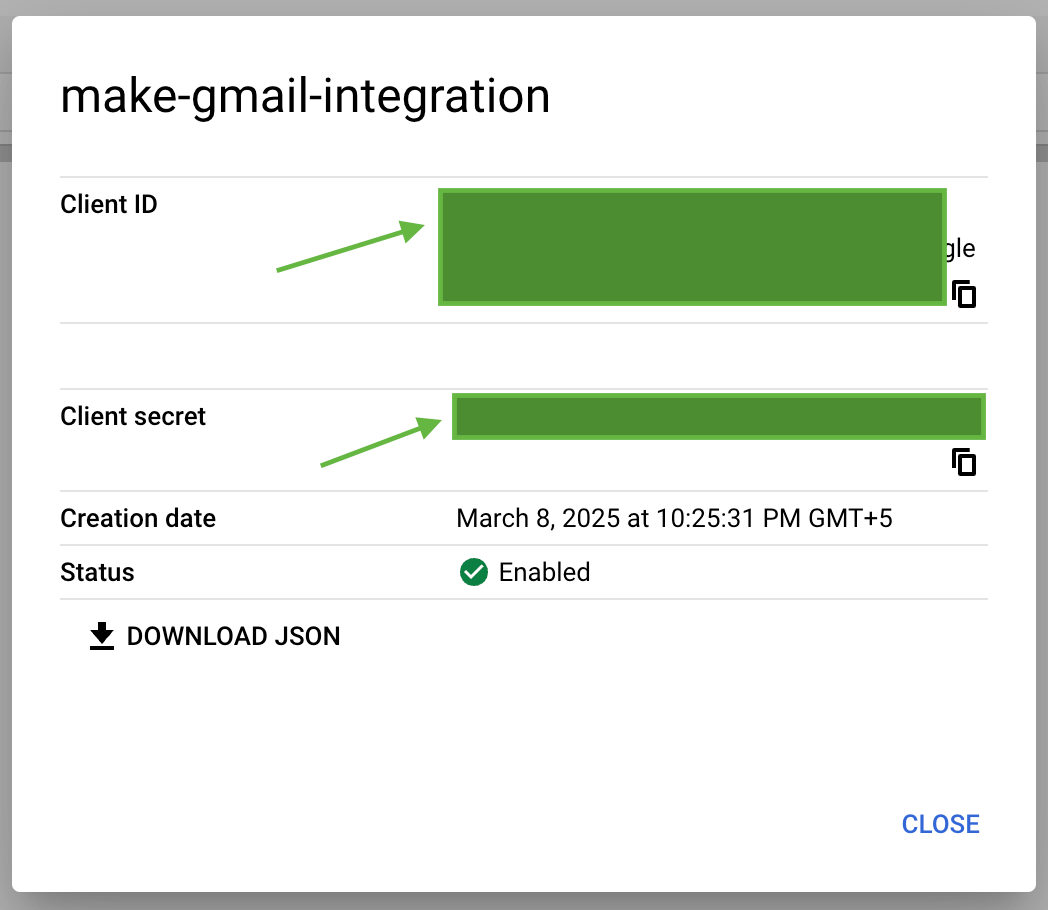
IMPORTANT: Copy both the Client ID and Client Secret and save them somewhere secure—you’ll need to enter these in Make when creating your connection
If you need to view these credentials later, just sign in to your Google Cloud Console, access your Project → Clients → OAuth 2.0 Client IDs
What We’ve Accomplished & What’s Next
Congratulations! Your Google Cloud Project is now all set up and ready to be connected to Make.com. You’ve successfully:
Created a Google Cloud project
Enabled the Gmail API
Set up authentication with a consent screen
Added authorized domains for Make.com
Created yourself as a test user
Set up the necessary API permissions
Generated client credentials for Make.com to use
While this setup process might have seemed technical, you’ve laid the foundation for a powerful automation system.
This configuration will allow Make.com to securely access your Gmail messages, which is the first crucial step in building your automated content idea generator.
Ready to move forward?

Want personalized help building your customized AI system?
I offer 90-minute sessions where we build your custom AI content system together.
When I get to Section 6 and try to update selected scopes...when I type in Gmail next to "Filter," I don't get the dropdown, so I never see the ones to check.